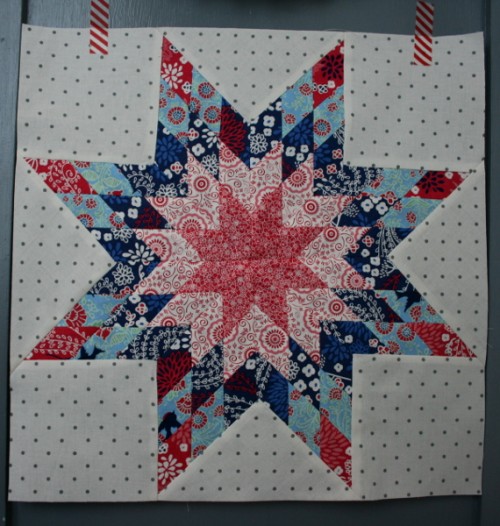
Lone Star Block Tutorial
Sure, let’s break down the steps for making a Lone Star Block, a classic quilt block pattern that might look complex but is quite achievable with some careful attention. Follow this easy-to-understand tutorial to create your own Lone Star Block:
Step 1: Gather Your Supplies
To make the Lone Star Block, you’ll need fabric in at least two colors. Traditionally, a contrasting color scheme is used to create the star’s distinct look. You’ll also need a cutting mat, rotary cutter, quilting ruler, and an iron.
Step 2: Cut the Fabric Strips
Take your two colors of fabric and cut them into strips. For instance, you might cut the main color into long strips and the secondary color into shorter strips. The width of the strips will depend on how big you want your finished Lone Star Block to be.
Step 3: Sew the Strips Together
Start by sewing the strips together to form long, multi-colored strips. You can sew the strips in alternating colors or any pattern you like. Press the seams open with your iron to make them flat.
Step 4: Cut Diamond Shapes
Using your quilting ruler and rotary cutter, cut the multi-colored strips into diamond shapes. These diamonds will be the building blocks of your Lone Star pattern.
Step 5: Assemble the Lone Star
Now comes the fun part! Arrange the diamond shapes to create the Lone Star pattern. The center will typically be one color, and then the other color will form the points of the star. Take your time to get the layout just right before proceeding.
Step 6: Sew the Diamonds Together
Carefully sew the diamonds together in rows, starting from the center and working outward. Take care to match the points of the diamonds accurately, as this will make your Lone Star Block look neat and precise.
Step 7: Press the Seams
Press the seams open with your iron to make the block lay flat. This step will also help your block look tidy and professional.
Step 8: Square Up the Block
Use your quilting ruler to trim the edges of the Lone Star Block and make it into a perfect square. Align the ruler with the edges of the diamonds to ensure a straight cut.
Congratulations! You’ve made your own Lone Star Block. Repeat the process to create more blocks if you want to make a larger Lone Star quilt. Once you have all the blocks, you can sew them together to complete your beautiful Lone Star quilt!
Remember, quilting is a creative and enjoyable process. Don’t be afraid to experiment with different color combinations and fabric choices to make your Lone Star Block uniquely yours. Happy quilting!
Access the Free Quilt Pattern / Lone Star Block Tutorial
If you liked this quilt model, but still want to see more options, below I’ll leave some news for you:
String Quilt Blocks Tutorial
Carpenter Star Quilt
Autumn at the Courthouse Quilt
We wish all our readers a great week full of God’s blessings in their homes, with good health, peace and prosperity and of course, lots of enthusiasm and creativity to start another piece of quilt, with wonderful colors.
These are Crochet Today wishes for you!