Crochet Beginners: How to, 6 Steps
Crochet Beginners. crochet is a very versatile and fun craft that can be used for all sorts of things, both big and small. If you’re new to crochet or just want to learn how to do some basic stitches, this guide is for you.
In this article, we will walk you through the steps needed to start crocheting. We’ll also provide some tips on how to crochet for beginners, so that you can get started on your projects with ease. So whether you’re looking for a quick project or something more challenging, this guide has everything you need to get started!
Crochet Beginners: The Basic Crochet Stitch
When you start crocheting, it can be a little overwhelming trying to understand all the different stitches and how they work together. That’s where this basic crochet stitch tutorial comes in!
crochet is a versatile craft that allows you to create beautiful items from simple chains to complex lace patterns. In this article, we’ll be teaching you the basic crochet stitch: the chain stitch.
To begin, chain two stitches together and make sure they are both the same size. Insert your hook into the first chain and pull up a loop (you will now have three loops on your hook). You can now do the same thing with the second chain, pulling up two loops (now you will have four loops on your hook). You’ve just made a basic chain stitch!
You can also create other stitches using this basic technique. For example, make a double crochet by doing two single crochets in one row (you will now have six loops on your hook). Or try making an hdc by crocheting into the back of each of the previous two stitches (now you will have eight loops on your hook). The possibilities are endless!
The Chain Stitch
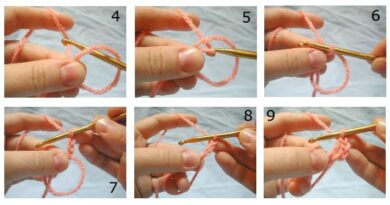
If you’re a beginner crocheter, one of the first things you’ll want to learn is how to chain. Chain is simply made up of loops, and it’s what you use to create your stitches. Here’s a quick tutorial on how to chain:
To chain, start by making a loop with the yarn in your hand. Make sure the loop is big enough so that you can hold it comfortably in your palm.
Next, insert your crochet hook into the top of the loop (above the Yarn), and pull up a loop (see image below). You now have two loops on your hook.
Insert your crochet hook into the bottom of the first loop, and pull up a second loop (see image below). You now have three loops on your hook.
Continue doing this until you have as many loops as you need for your stitch. For example, if you’re going to make an H stitch, you’ll need four loops on your crochet hook.
Once you have all of the loops necessary for your stitch, yarn over (see image below), and pull through all of the loops on your crochet hook (see below). You’ve now completed your chain stitch!
The Single Crochet
Crocheting is a great way to introduce yourself to the world of yarn, and it’s also an incredibly versatile craft! In this guide, we’re going to teach you the basics of how to crochet using a single crochet stitch. This basic stitch is the foundation for all other crochet stitches, so mastering it is essential if you want to create beautiful patterns.
To begin, insert your hook into the first chain from the beginning of your fabric, then grab a loop of yarn and pull it through the chain. Now make sure the hook lies in front of the chain (between the yarn loops), and make another loop by pulling the end of the yarn through both loops on your hook. Keep doing this until you reach the end of your fabric.
Now you can move your hook up along one side of your work (the “back” side), making sure that you keep those newly made loops hanging down. When you get to the top corner, make two more loops and pull them tight – this forms your first single crochet stitch! Repeat these steps across your entire piece, working each single crochet stitch as before.
The Double Crochet
If you’re new to crochet, or even if you’ve been crocheting for a while, there are a few tips that will make your work go smoother. Follow these simple steps and you’ll be crocheting like a pro in no time!
1. Hold the yarn in your left hand, with the working thread coming out of the top of the hook.
2. With your right hand, hold the yarn about 2 inches from the end and insert the hook into the work from front to back (see photo). You now have two loops on your hook.
3. Yarn over once (or twice if necessary) and pull through both loops on your hook (photo). You’ve made one double crochet (dc).
4. Do this again by inserting the hook into the work from front to back and yarn over, then pulling through both loops on your hook (dc). You now have two dc’s on your hook.
The Foundation Row
For crochet beginners, the Foundation Row is a key foundation stitch. It’s also a great way to help make your stitches look uniform and creates an overall stable fabric. Learning this one stitch will help you build up your crochet skills quickly.
To begin, attach your yarn at the front of your work (the right side if you’re right-handed). Make a ‘ch’ (or half)hitch with the first color and insert your hook into the second color just behind the first ch (see diagram below).
Yarn over and pull through both colors on the hook (2 loops on hook). You now have a double loop on your hook. Yo, pull through both loops on the hook (1 loop left on hook), and that’s one stitch! *Ch 1, turn*
Foundation Row Stitches:
ch = chain; hdc = half double crochet; sc = single crochet; dc = double crochet
If you’d like to learn more about crochet stitches, be sure to check out our comprehensive guide!
Advanced Techniques for Crocheters
There are a few advanced crochet techniques that can help make your projects even more beautiful and seamless. These include working in the round, using invisible stitches, and increasing or decreasing stitches.
Working in the round is great for creating hats, scarves, and other circular items. To do this, start by making a chain with a desired length. Then use the slip stitch to join the chain to create a circle. Keep working in this circle until your project is complete.
Another advanced technique is working with invisibles. This means crocheting with only back loops yarn left on the hook. When you do this, your stitches will disappear and your project will be much smoother and neater looking than if you were to crochet with both front and back loops.
Finally, there are times when you may want to increase or decrease stitches in your project. For example, if you’re crocheting an item that’s going to be smaller after it’s finished (such as socks), you can work some increases into the pattern to make it bigger at the end.
Or if you’re making something for someone who wears a size large shoe but also has broad feet, you could add a few decreases at the end of the pattern to narrow it down to their size without having to start over from scratch!
If you liked this article, share and like on Facebook.
Please tag your photos on facebook and post your final result in my group.
JOIN THE FACEBOOK GROUP CLICK HERE
Learn how to make Crochet Beginners: How to, 6 Steps:
Access the free pattern / Crochet Beginners: How to, 6 Steps
If you liked this pattern but want to see more options for patterns to make with crochet yarn, below we leave some more models for you to be inspired by:
Crochet Angel Patterns for Christmas
How to Make Quick Crochet Blanket Borders
07 Crochet Baby Dress Pattern Free
The 5 Best Crochet Patterns For Blankets
See Now A Beginner’s Guide to Crochet!
Simple Crochet Patterns For Beginners
Kids’ Crochet Dresses: How To Make
All of us had a great week, full of God’s Desired houses in their works, and a lot of creativity to start another project mainly with crochet yarn.
With love and affection, Crochet To Day Free!