Crochet Tutorial: How To Master The Crochet Knitting Stitch
Crochet Tutorial: Crochet is a centuries-old craft that is enjoying a resurgence in popularity these days. It’s versatile, easy to learn, and can be used for a variety of projects. One of the most commonly used stitches in crochet is the knitting stitch. If you’re new to crochet, learning how to do the knitting stitch is essential for success. In this crochet tutorial, we’ll show you how to do it step-by-step.
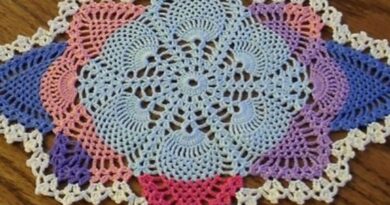
The Crochet Knitting Stitch
The Crochet Knitting Stitch is a simple but effective stitch used to create lightweight fabric. It’s also a great way to practice your basic crochet stitches while knitting. The key to mastering this stitch is keeping your yarn tension loose so the fabric drapes nicely.
Crochet Tutorial: The Basic Crochet Pattern
Crochet is a versatile craft that can be used for a variety of projects, including blankets, hats, scarves and even purses. In this tutorial, we will show you how to master the crochet knitting stitch, which is an essential skill for any crocheter.
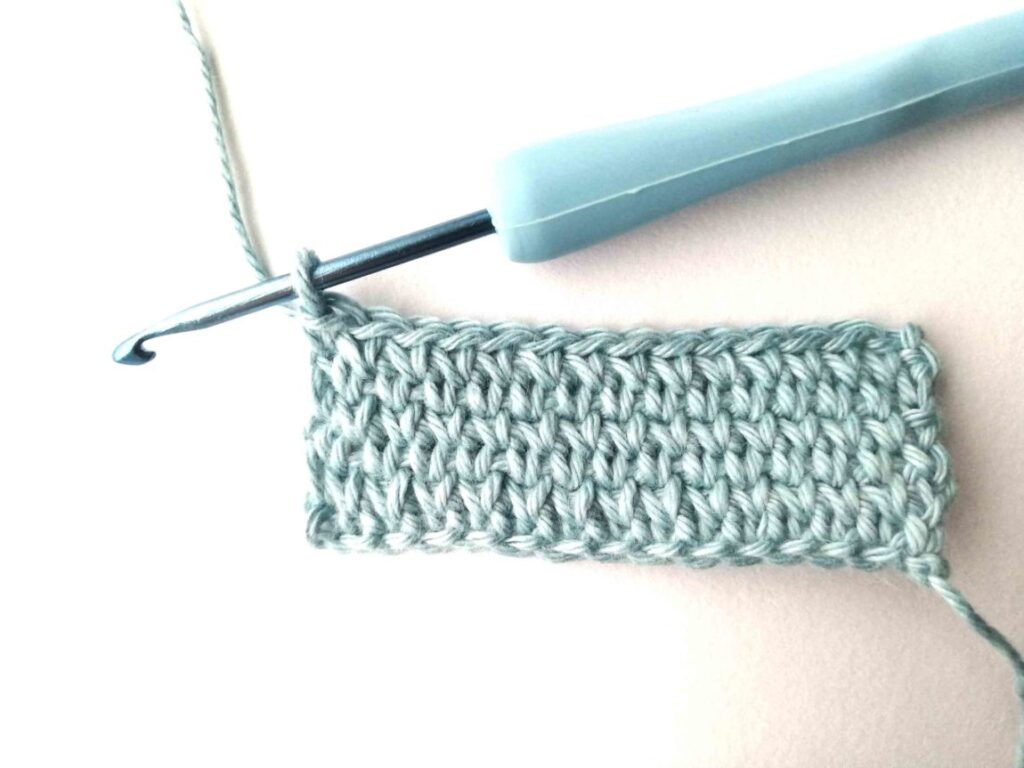
To start, make a chain foundation using whatever length you prefer. For our sample project, we’ve chosen to use a chain of 20. Once you have your chain foundation created, work into the second chain from the hook (counting as your first crochet stitch), and then work 2 double crochet stitches into the next stitch.
Repeat these instructions across the row until the piece measures desired length. To complete the row, turn your work and work 2 single crochet stitches into each double crochet stitch.
Once you have completed one row of knitting stitches, it’s time to start working in reverse! Begin by inserting your needle into the last single crochet stitch on either side of your work and pull up a loop. Then work 3 single crochet stitches into that loop (2 counts as 1 “crochet knit”). Finally, weave in any loose ends and you’re done!
Crochet Tutorial: How to Make a Crochet Knitting Cable
If you’re a novice crocheter and have never tried the crochet knitting stitch, now is the time! This simple stitch is a great way to add some texture and interest to your crochet projects.
To get started with the crochet knitting stitch, we first need to create a chain. Make a slip knot and chain enough stitches to equal the desired length of your cable. We then insert our hook into the top of the first chain and yarn over.
Yarn over again and pull through both loops on the hook. You now have two loops on your hook. Yarn over again and pull through both loops on the hook. You now have one loop left on your hook. Yarn over again and pull through all three loops on the hook. Your cable should look like this:
Now we want to do something with our newly created cable! To start, insert your hook into any space along the cable and Yo (yarn over) twice, then pull out through both loops on the hook. Do this two more times, creating three “loops.” We’re going to add these loops together by doing a single crochet in each of the three loops (from front to back):
Next, do a double crochet in each of the next two loops:
And lastly, do a treble crochet in each of the last two loops:
The finished crochet knitting cable should look something like this:
There are lots of different ways you can use this simple crochet knitting stitch. You can use it to create a border around your project, add texture to a piece of crochet fabric, or even create a hanger for your clothes! Try different stitches and combinations to find what works best for you!
How to Make a Crochet Knitting Bobble
Crochet knitting bobbles are a great way to add some extra texture and interest to your crochet projects. They’re super easy to make and can be worked in any size or color you want. Here’s how to create a crochet knitting bobble:
1. Start by making a chain long enough to fit the desired diameter of your bobble.
2. Work a single crochet (sc) in the second stitch from the hook, then sc in each of the remaining stitches. You’ll end up with a ring of scs around the base of your bobble.
3. Turn your work so that the working yarn is now facing outwards, and dc in each of the stitches around the ring created by step 2. You’ll end up with a dangly crochet bobble!
4. To finish, ch 1, turn your work so that the wrong side is facing out, and ss into the first stitch created in step 3.
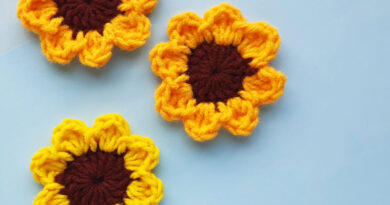
How to Make a Crochet Knitting Flower
Crochet is a versatile craft that can be used for a variety of projects, from blankets and hats to afghans and throws. While crocheting knitting stitches may seem like a daunting task at first, with the help of this tutorial, you’ll be able to master the technique in no time!
To start, make a slip knot using your preferred method. Next, chain 35 (or whatever size you need to get the desired height for your flower). Here’s where things start to get tricky: You’ll now want to crochet into the second chain from the hook (and every single chain after that), work 2 dc into each stitch. Here’s a helpful reminder of what those stitches look like:
It should now look like this:
Once you’ve completed your first round of dc, it’s time to turn your work. You’ll now want to work 1 sc into each stitch around (except for the one at the bottom that you just made a slip stitch in). Be sure to leave that last stitch unworked so that you can easily attach your flower stem later on:
Once you’ve completed your first round of sc, it’s time to join your ends together by doing a slip stitch into the top of the unworked stitch from before:
And there you have it! Your very own crocheted knitting flower! Now all you need is some fabric and some creativity (or maybe some help from a friend) to put it all together.
How to Make a Crochet Knitting Square
Crochet is a centuries-old technique used to create fabric from yarn. With crochet, you can make squares, rectangles, and even circles. This tutorial will show you how to master the Crochet Knitting Stitch so that you can create beautiful crochet squares.
To begin, chain the required number of stitches (in this tutorial, we’ll use CH 2). Then make a slip stitch in the second chain from the hook (or any chain hanging below it). Make sure your slip stitch is tight enough so that it won’t come undone.
Next, make a crocheted loop (CH 3) with your yarn and insert it into the slip stitch from before. Now pull up on the loop until it’s snugly closed – you now have a crocheted square! Continue making crocheted squares until your project is finished.
If you liked this article, share and like on Facebook.
Please tag your photos on facebook and post your final result in my group.
JOIN THE FACEBOOK GROUP CLICK HERE
Learn how to make Crochet Tutorial: How To Master The Crochet Knitting Stitch:
Access the free pattern / Crochet Tutorial: How To Master The Crochet Knitting Stitch
If you liked this pattern but want to see more options for patterns to make with crochet yarn, below we leave some more models for you to be inspired by:
07 Crochet Baby Dress Pattern Free
The 5 Best Crochet Patterns For Blankets
See Now A Beginner’s Guide to Crochet!
Simple Crochet Patterns For Beginners
All of us had a great week, full of God’s Desired houses in their works, and a lot of creativity to start another project mainly with crochet yarn.
With love and affection, Crochet To Day Free!