Crochet Poncho Patterns: How to Make?
Crochet Poncho Patterns. Crochet is one of the oldest forms of textile art, and it’s not hard to see why. The basic crochet stitch is simple, versatile, and quick to make. Plus, crochet is a great way to use up leftover yarn from other projects.
In this blog post, we will provide you with crochet poncho patterns for adults. Whether you’re looking for something soothing and warm for winter weather, or something fashionable and eye-catching for an autumn day out, we have you covered. So get ready to start crocheting!
What is a crochet poncho?
A crochet poncho is a versatile and stylish item to keep you warm on cool days. There are a variety of crochet poncho patterns available, so you can find the perfect one for your needs.
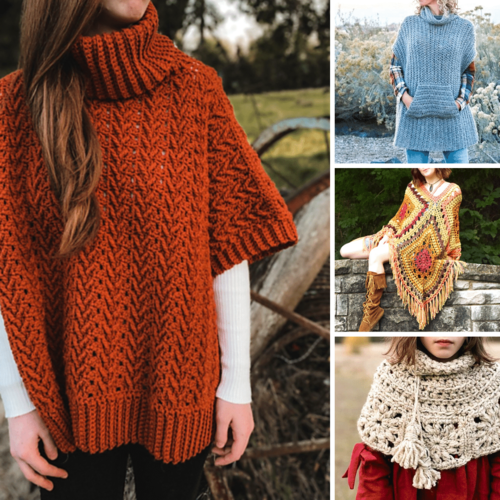
Here are three crochet poncho patterns that are perfect for adults: The Bobbin Poncho, the Chevron Poncho, and the Ruffle Poncho.
The pattern provides instructions for an adult size poncho (58 inches wide by 20 inches long) and a child size (36 inches wide by 18 inches long).
Chevron is also a simple crochet pattern, but it is more complex than the Bobbin . Chevron features diagonal stitches that create a textured look.
Ruffle is another crocheted pattern that features ruffles along the edge of the fabric. This design is worked in one round from start to finish, so it is quick and easy to make. The Ruffle Poncho can be made as either an adult-sized poncho (68 inches wide by 26 inches long) or a child-sized poncho (44 inches wide by 20 inches long).
How to crochet a poncho
Crochet a poncho is an easy project that is sure to keep you warm during the colder months. With a few basic stitches, you can create this cozy piece of fabric.
To begin, chain the desired number of stitches and join with a slip stitch. You will now work in continuous rounds until the poncho is the desired length.
Round 1 (RS): Ch 3 (counts as first dc), dc into same st, 2 dc into next st, *ch 2, skip next 2 sts, dc into next st; rep from * around.
Round 2: Ch 1, sc into first dc, ch2 sp into each of next 2 sts, *sc into next dc, ch2 sp into each of next 3 sts; rep from * around. Join with a slip stitch in first sc. Fasten off and weave in ends.
Crochet Tips for Crocheting a Poncho
Crocheting a Poncho is an excellent way to use up lots of leftover yarn and crochet stitches. Here are some tips for crocheting this versatile garment:
1. Make sure the size fits before beginning to crochet. A poncho pattern is designed to be worked in multiples of 2, so make sure to check the finished measurements before continuing.
2. To keep your stitches even, try using a single strand of yarn throughout your project. This will help you conserve yarn and make your project go faster.
3. If you find yourself running out of yarn at any point during your project, don’t be afraid to substitute another type of yarn for the missing skein- just make sure the substitution is equivalent in weight and size to the original yarn you used.
4. To create a more textured effect in your poncho, work with two colors of yarn at once- this will give your project a nice three-dimensional look.
5. When crocheting rounds in the round, always join each new round with a slip stitch into the first stitch of the previous round- this will help prevent holes from forming in your fabric as you work.
How to make a crochet poncho size chart
The crochet poncho can be made in any size, but it’s helpful to have a size chart handy when crocheting. This crochet poncho size chart shows the measurements for a medium-sized poncho. If you want to make a larger or smaller poncho, simply adjust the number of stitches in the round or rows you are working with.
To make a crochet poncho:
1. Chain 186 (200).
2. Work 8 (10) rounds in double crochet (dcs), ending with a slip stitch in the top of first dc. Break yarn and secure end.
3. Weave in ends.
Crochet the front and back of your poncho
The crochet poncho is a versatile project that can be crocheted in a variety of colors and styles. The front and back of the poncho can be different colors or patterns, making it a unique and stylish addition to your wardrobe.
To begin, chain 113. To create the front panels, start in the middle of the chain with a slip stitch and dc in each stitch across. Fasten off, leaving a long tail to attach the next panel.
Ch 55 and turn, sl st into next 4 dc from previous panel, ch 1, sk first st, 3 sc into next st, ch 1, sk first st; join with sl st into top of beg ch-1. (54 sts)
Fasten off. Weave in ends.
Repeat instructions for back panels. Complete both panels before fastening off. Weave in ends securely. Block if desired.
How to seam the front and back of your poncho
If you’re looking for a cozy, weather-resistant crochet poncho to wear on chilly days, you can create one from a basic rectangle shape. The front and back of the poncho are seamed together using a simple seam technique.
To begin, chain 86 (96 in total). Then make 12 (14) chain stitches in the second chain from hook. Skip the next 2 chains and make a dc in each of the next 4 (6) chains. *Skip the next 2 chains and make a trc in each of the next 4 (6) chains. Repeat from * across, ending with a final trc in the last chain. Turn your work so that your wrong side is facing and continue crocheting along the bottom edge of your rectangle. This will form your base pattern for your poncho.
Next
increase your stitches by making 3 dc’s in each stitch across (157 [177] stitches). Leave an 8″ tail at the end of this round for later use. You now have two options: you can either turn your work so that it is right side out again and finish crocheting along the top edge like you did before, or you can continue crocheting around the entire circumference of your poncho like follows:
Round 1: Ch 3 (count as first dc here and throughout), dc into same space as ch-3 just made; *skip 2 sts, make 2 dc’s in next st; repeat from * around.
Rnd 2: Ch 2, dc into each of the first 2 sts, skip the next st, make a trc in the next st; *ch 1, dc into each of the next 3 sts, ch 1, sk next st, make a trc in the next st; repeat from * around.
Round 3: Ch 1, sc into each of the first 2 sts, ch 1, sk next st, make a dc into each of the next 3 sts; *ch 3, sc into each of the next 4 sts, ch 1, sk next st, make a dc into each of the next 3 sts; repeat from * around.
Finish crocheting by working your final round of sc’s around the edge. Weave in all your ends and you’re done!
Finishing touches for your crochet poncho
Are you ready to finish your crochet poncho project? Here are a few final tips to help you along the way.
1. Make sure all your stitches are tight and even. This will help prevent fraying and keep your poncho looking nice and neat.
2. Pin the pieces together if they’re not already attached, then begin crocheting in the round (in a continuous loop). You can use a stitch marker to keep track of where you are in the round, or just hold one end of the yarn in each hand and count how many rounds it takes to go from one end of the piece to the other.
3. When you get to the end of the round, cut off the yarn, pull it through all of the loops on one side of your work (this is called “join-up”), then do the same thing on the other side. Close up any gaps with some more crochet stitches (or tapestry needle work).
4. Now it’s time for a finishing touch: Weave in all of those ends! Use a tapestry needle, or try this fluffy knot technique: Hold one end of each thread close to each other, then twist them together tightly into a knot. Once all ends are tucked in, cut off any excess threads. Your crochet poncho is finished!
If you liked this article, share and like on Facebook.
Please tag your photos on facebook and post your final result in my group.
JOIN THE FACEBOOK GROUP CLICK HERE
Learn how to make Crochet Poncho Patterns:
Access the free pattern / Crochet Poncho Patterns: How to Make?
If you liked this pattern but want to see more options for patterns to make with crochet yarn, below we leave some more models for you to be inspired by:
Crochet Angel Patterns for Christmas
How to Make Quick Crochet Blanket Borders
07 Crochet Baby Dress Pattern Free
The 5 Best Crochet Patterns For Blankets
See Now A Beginner’s Guide to Crochet!
Simple Crochet Patterns For Beginners
Kids’ Crochet Dresses: How To Make
All of us had a great week, full of God’s Desired houses in their works, and a lot of creativity to start another project mainly with crochet yarn.
With love and affection, Crochet To Day Free!