Awesome Crochet Owls, Free Patterns
Crochet Owls are one of the most popular animals to crochet, and for good reason. They’re classy, sophisticated little creatures with a timeless appeal. But if you’re new to crocheting owls, you might be wondering where to start.
Well, fear not: we’ve got you covered! In this post, we’re introducing you to some awesome crochet owls and providing free patterns so you can get started right away. We hope you enjoy these crochet owls as much as we do!
How to make a crochet owl
In this tutorial, we will show you how to make a crochet owl. This is a very simple and easy project that can be completed in no time at all!
To start, you will need some basic supplies: a size H hook, worsted weight yarn (this pattern uses DK weight yarn), and a small amount of stuffing.
First, chain 4 and form an loop. Draw up your chain four and slip it off the hook. Join the new loop with the first one by crocheting into the top of the newly made loop (see photo). Continue crocheting in this manner until you reach the desired length.
Now, it’s time to add some details to your owl! Begin by chaining 4 again and making another loop. Skip over the first two stitches and insert your hook into the next stitch, then pull up aloop (see photo).
Yo yo back down to where you started and insert your hook into the next stitch, then draw up a loop (see photo). You now have two loops on your hook. YO yO these two loops together (see photo). You now have an “eyed” owl! Repeat these steps for each side of your owl (four Eyes total).
Next, it’s time to add some stuffing! You can either use store-bought stuffing or simply stuff your owl with some fiberfill yarn. We recommend using around 1/2 cup per Owl.
What materials do I need to make a crochet owl?
To make a crochet owl, you will need:
-A light worsted weight yarn, such as Lion Brand Wool-Ease or Bernat Softee Baby Yarn
-Two 5.5 mm crochet hooks
-Tapestry needle
With the help of the tapestry needle, begin by making a small chain. Use this chain to attach the yarn to one of the hooks (the “working” hook), then line up the second hook with the first chain and crochet around it.
You’ll now have a ring. *Insert your crochet hook into the ring, then pull up a loop* (You’ll have 2 loops on your hook). Yarn over once more and pull through both loops on your hook. This makes a stitch. Repeat from * to * around the ring, making sure to join each stitch together with aslip stitch (shown in red in diagram below).
When you’re finished, your owl’s body should measure about 3 inches long and 1 inch in diameter at its widest point. Don’t forget to finish off your owl’s beak by crocheting two small stitches in between each of the larger ones – this will keep its shape!
How to make a crochet owl head
Crochet an owl head with this free pattern! This crochet owl is a cuddly addition to your craft collection and it’s quick and easy to make. The basic shape of the owl is made with simple stitches, so you can customize it for your own project.
To create the eyes and beak, start by crocheting a small ring around the base of the head using single crochet. Work 3 or 4 rounds in this pattern. Then using a tapestry needle, stitch through all of the loops on the hook to close up the hole. Do not pull tight – just enough so that there is no visible gap between each round.
Next, pipe a soft light brown yarn through one of the round eyeholes and out the other side. Filling in any gaps as you go. Repeat for second eyehole. Be sure to leave enough excess yarn at both ends to sew onto the head later (you will use this to hold it in place while you attach it).
For the tuft of hair at the top of the head, start by doing a double crochetRow 1: Ch 2; dc into second ch from hook; *skip 1 ch; rep from * to end.Rows 2-5: Ch 2; dc into first dc and next ch; skip 1 ch; rep from * to end.
Leave a long tail for sewing later (about 18”). Weave in all ends securely before moving on to the next step.
Next step
To create the owl’s body, start by crocheting a small ring around the base of the head using single crochet. Work 3 or 4 rounds in this pattern. Then using a tapestry needle, stitch through all of the loops on the hook to close up the hole. Do not pull tight – just enough so that there is no visible gap between each round.
Next, pipe a soft light brown yarn through one of the round eyeholes and out the other side. Filling in any gaps as you go. Repeat for second eyehole. Be sure to leave enough excess yarn at both ends to sew onto the head later (you will use this to hold it in place while you attach it).
Attach yarn to top of head where hair starts (closest to eyes). Ch 1; sc into same st; rep from * around. Joining with slip st into first sc, finish off and weave in ends securely.
Now is a good time to attach your owl’s beak using some white yarn . Start by crocheting a small loop about 1-inch long and put this loop through one of the round eyeholes. Make sure it
How to make a crochet owl body
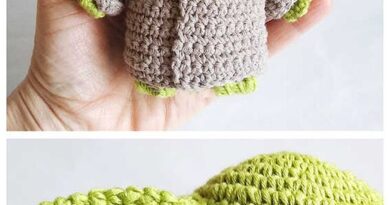
Crochet an owl body using the free pattern below! This easy-to-follow pattern is great for beginners and features a stylish, up-close crocheted owl body. The owl is made from a simple crochet base that can be customized in any way you like. You can make your owls any size or color you desire, and they make perfect additions to any room.
To start, chain 88 (96, 112). In the second chain from the hook (and every chain following), work 2 dc (3 dc, 4 dc) into the center of the chain. You will end up with a total of 16 (20, 24) dc rows formed. DO NOT Finish off yet!
Switch to row 3 of your work (the bottom row). Work 3 sc into each stitch across.
DO NOT FINISH OFF YET!
Row 4: Ch 1 and turn. Working back down the other side of the Owl Base Row 3 stitches, sc in next stitch, 2 sc in next stitch, *sc in next 2 stitches; 2 sc in next stitch* Rep from * to *. You should now have 8 (10, 12) evenly spaced sts around your Owl Base Row 3 sts. Do not finish off yet!
Row 5: Ch 1 and turn again. Working back down the other side of Owl Base Row 3 sts again, sc in next stitch and dec (1 sc Decrease), *sc in next 2 stitches; dec* Rep from * to *. You now have 6 (7, 8) evenly spaced sts around your Owl Base Row 3 sts. DO NOT FINISH OFF YET!
Row 6: Ch 1 and turn. Working back down the other side of Owl Base Row 3 sts again, sc in next 2 stitches and dec (1 sc Decrease), *sc in next stitch; dec* Rep from * to *. You now have 4 (5, 6) evenly spaced sts around your Owl Base Row 3 sts. DO NOT FINISH OFF YET!
Row 7: Ch 1 and turn. Working back down the other side of Owl Base Row 3 sts again, sc in next stitch and dec (1 sc Decrease), *sc in next 2 stitches; dec* Rep from * to *. You now have 2 (3, 4) evenly spaced sts around your Owl Base Row 3 sts. DO NOT FINISH OFF YET!
Finish off by working a sl st into the first stitch of the last row you completed. Weave in all ends. Enjoy your stylish crocheted owl body!
How to make a crochet owl wings
Crochet owl wings are a fun and easy project that can be completed in no time at all. All you need is some basic crochet stitches and a little bit of patience. You can make your owls using either light or heavy yarn, depending on how big you want them to be.
Once the wings are complete, they can be embellished with any kind of details ornaments that you like. Here are the steps for creating these adorable crochet owls:
1) Begin by making a magic ring and chaining 2 together (or using the appropriate starting chain for your yarn). Work 10 sc in the ring.
2) Work 2 sc in each of next 3 st, *ch 1, sk 1 st, work 1 sc in next st; rep from * around.
3) Change to light green yarn and work 1 sc in each of next 2 sts, *ch 1, sk 1 st, work 2 sc in next st; rep from * around.
4) Change to dark green yarn and work 1 sc in each of next 3 sts, *ch 1, sk 1 st, work 4 sc in next st; rep from * around.
5) Change to yellow yarn and work 1 sc in each of next 4 sts, *ch 1, sk 1 st, work 6 sc in next st; rep from * around.
6) Change to orange yarn and work 5 sc in ring (this will create the owl’s body), then change
Tips for making a great crochet owl
There are so many different crochet owls out there, it can be hard to decide which one to make. Here are some tips for making a great crochet owl.
1. Choose a pattern that is easy to follow. Some patterns are very detailed, while others are simpler.
2. Start with a basic shape and then add details as you go. This will help you keep track of your progress and make sure the finished owl looks realistic.
3. Make sure your yarn is the correct weight for the project – too light and your owl will look like a toy, too heavy and it will be too bulky to move around easily.
4. Use a specific type of yarn for the feathers – something that won’t pill easily or fray easily.
5. Be creative – there are no limits to what you can make with a crocheted owl!
If you liked this article, share and like on Facebook.
Please tag your photos on facebook and post your final result in my group.
JOIN THE FACEBOOK GROUP CLICK HERE
Learn How to Awesome Crochet Owls, Free Patterns
Access the free pattern / Awesome Crochet Owls, Free Patterns
If you liked this pattern but want to see more options for patterns to make with crochet yarn, below we leave some more models for you to be inspired by:
Free Mile a Minute Crochet Pattern Ideas
5+ Easiest Fingerless Gloves Free Crochet Patterns
Adorable Baby Set Free Crochet Patterns
How to Change Colors In Crochet
5 Incredible Hugs and Kisses Baby Blanket Ideas You Will Love
All of us had a great week, full of God’s Desired houses in their works, and a lot of creativity to start another project mainly with crochet yarn.
With love and affection, Crochet To Day Free!